The most common question we receive from new OnCourtAI users is not about the AI, the scores, or the coaching advice. It is about the video. "How should I film?" "Does the angle matter?" "Do I need a tripod?" "How many shots should I record?"
These are the right questions to ask, because the quality of your AI analysis is directly linked to the quality of your video. Our models are remarkably good at extracting biomechanical data from smartphone footage, but they are not magic — they need to be able to see your body clearly, from the right angle, with enough context to track your full movement. Get the video right and the analysis will be precise, detailed and genuinely useful. Get it wrong and you are giving the AI incomplete information, which means incomplete coaching.
This guide covers everything you need to know to capture the best possible video for AI tennis analysis. None of it requires expensive equipment. A modern smartphone is all you need.
Camera Angle: The Single Most Important Factor
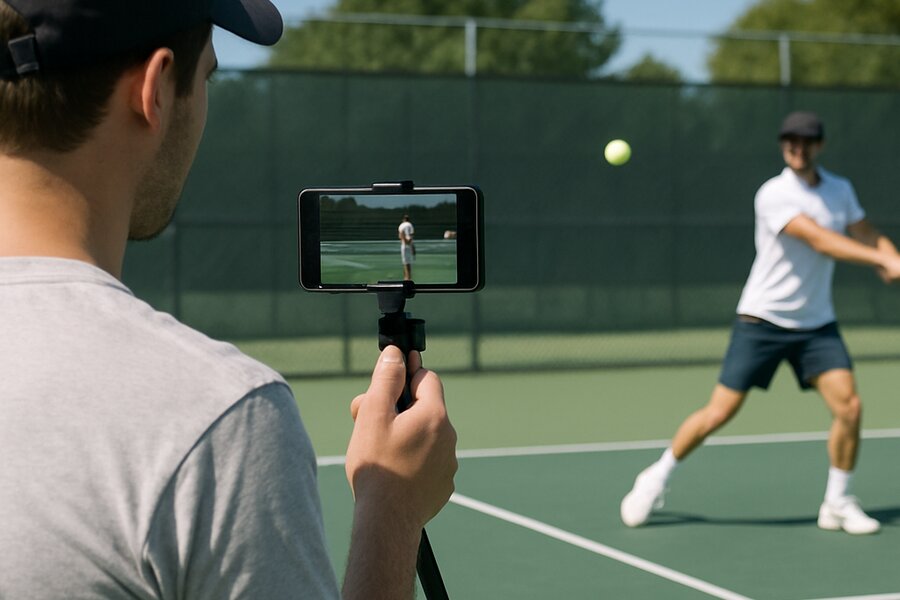
If you take one thing from this article, make it this: film from the side of the court, not from behind the baseline.
The most natural instinct when filming tennis is to stand behind the player, facing the net. It is the angle you see on television for most points. But for biomechanical analysis, it is the worst possible angle. From behind the player, the AI cannot see the lateral movement of the racket, the full extension of the arm at contact, the depth of the backswing, or the path of the follow-through. The body's most important movements during a tennis stroke happen in the sagittal plane — the side-to-side plane — and you can only see them from the side.
The ideal camera position is directly to the side of the player, roughly in line with the baseline, on the same side as the player's dominant hand. If the player is right-handed, stand to their right side. If they are left-handed, stand to their left. This gives the AI a clear view of the full swing arc from preparation through contact to follow-through, with the racket visible throughout the entire motion.
If you cannot get exactly side-on — perhaps the court layout makes it difficult — a slight angle towards the player (around 30 degrees from pure side-on) is acceptable. What you want to avoid is any angle that places you significantly behind or in front of the player, as these compress the depth of the swing and make accurate measurement much harder.
What About Serves?
For serves, the same principle applies but the optimal angle shifts slightly. The best position is side-on to the player at roughly a 45-degree angle — so you can see both the toss and the full overhead motion. Filming from directly behind during a serve captures the ball toss well but loses almost all information about the racket path, trophy position and pronation at contact.
Distance: Close Enough to See, Far Enough to Capture
The sweet spot for filming distance is 3 to 4 metres from the player. This is close enough that the AI can track individual joints with high confidence, but far enough away that the player's full body — from feet to the top of the racket on the backswing — remains in frame throughout the entire stroke.
The most common distance mistake is filming too far away. If you are standing 8-10 metres from the player, the body occupies a relatively small portion of the frame, and the AI has fewer pixels to work with when tracking joint positions. This reduces tracking accuracy, particularly for smaller body parts like the wrist and hand that are critical for technique analysis.
The second most common mistake is filming too close. If you are standing 1-2 metres from the player, you will almost certainly cut off part of the body during the swing — the racket tip on the backswing, the feet during a wide step, or the follow-through above the head. Any body part that leaves the frame is a gap in the data.
If you are unsure, err on the side of slightly too far rather than slightly too close. The AI handles reduced resolution better than it handles missing body parts.
Lighting: Work With the Sun, Not Against It
Good lighting makes a substantial difference to tracking accuracy. The AI needs to be able to distinguish the player's body from the background, and it does this primarily through contrast — the visual difference between the player's clothing, skin and racket against the court surface and surroundings.
The ideal scenario is natural daylight with the sun behind or to the side of the camera. This illuminates the player's front and side evenly, creating clear contrast against the court. The scenarios to avoid are backlighting (the sun behind the player, which turns them into a silhouette) and harsh overhead sun at midday, which creates deep shadows that can confuse joint tracking.
Overcast days are actually excellent for AI analysis. The diffused light eliminates harsh shadows and provides even illumination across the player's body. If you have a choice of when to film, an overcast morning or a late afternoon with the sun low and to the side will produce the best results.
For indoor courts, the main consideration is overall brightness. Most indoor facilities have sufficient lighting for good analysis, but courts with very dim lighting or strong overhead spotlights that create pools of light and dark can reduce tracking accuracy. If your indoor court has uneven lighting, try to position the player in the best-lit area.
Stability: Steady Is Better Than Perfect
A stable camera produces better analysis than a handheld camera that follows the player around the court. The AI's tracking algorithms work best when the background is relatively static, because it uses background reference points to calibrate the player's movement.
If you have a small tripod or a phone mount, use it. Position the camera at approximately hip height — this puts the lens at a natural angle to capture the full body without distortion. Smartphone tripods are inexpensive and make a noticeable difference to the quality of every video you capture.
If you do not have a tripod, ask someone to hold the phone as steadily as possible, with both hands, and to resist the urge to pan or zoom during the recording. A static wide shot is always better than a moving close-up for AI analysis purposes.
How Many Shots to Record
We recommend recording at least 3 complete swings of the same stroke type per video. This gives the AI enough data to identify your consistent patterns rather than scoring a single unrepresentative shot. Five to eight swings is ideal — enough for statistical confidence without making the video unnecessarily long.
The key word is "same stroke type." Upload separate videos for your forehand, backhand, serve and volley. Mixing stroke types in a single video forces the AI to segment different stroke types within one clip, which is possible but produces better results when each video contains a single stroke type.
When recording multiple swings, keep the camera running continuously rather than starting and stopping between shots. The AI's shot detection algorithm handles continuous video smoothly, and the transitions between shots provide useful data about your recovery position, footwork between strokes and overall movement patterns.
What to Wear
This might seem like a minor point, but clothing colour matters more than you might expect. The AI tracks body segments by identifying visual contrast between different body parts and between the body and the background. Clothing that is very similar in colour to the court surface — green on a green hard court, grey on a grey indoor surface — reduces that contrast and can make tracking marginally less accurate.
The simplest advice is to wear something that contrasts with the court. Bright colours, dark colours on light courts, or light colours on dark courts all work well. Avoid baggy clothing that obscures the body's actual position — fitted activewear gives the AI the clearest view of your joint positions.
Common Mistakes to Avoid
Based on the thousands of videos we process, here are the most frequent filming mistakes that reduce analysis quality:
Filming from behind the baseline. This is by far the most common error. It feels natural but it is the worst angle for biomechanical analysis. Always film from the side.
Cutting off body parts. If the racket leaves the frame at any point during the swing, the AI loses data for that moment. Frame wide enough that everything stays visible, even on the biggest backswing or follow-through.
Filming in portrait mode. Landscape orientation gives the AI a wider field of view, which is essential for capturing the full lateral range of a stroke. Portrait mode works but often cuts off the racket at the extremes of the swing arc.
Moving the camera during recording. Panning to follow the ball or zooming in mid-swing introduces motion blur and changes the frame of reference the AI is using to track joints. Keep the camera still and let the player move within the frame.
Recording too few swings. A single swing might be your best or your worst of the session. Three or more swings give the AI enough data to identify your real patterns and produce a meaningful average score.
The Quick Checklist
Before you hit record, run through this checklist:
1. Camera position: side of the court, in line with the baseline, on the racket-hand side
2. Distance: 3-4 metres from the player
3. Framing: full body visible from feet to racket tip, landscape orientation
4. Lighting: sun behind or beside the camera, not behind the player
5. Stability: tripod if possible, static handheld if not
6. Clothing: contrasts with the court surface
7. Shot count: at least 3 complete swings of the same stroke type
Get these seven things right and you will consistently produce videos that give the AI everything it needs to deliver accurate, detailed and genuinely useful biomechanical analysis. Upload your first session at oncourtai.co.uk/mobile-app and see the difference good filming makes.